This will be a four part series giving you a step-by-step walk-through on how to:
- Create an MS Graph custom connector for groups
- Create an MS Graph custom connector for group members
- Create Procore API custom connector to GET all users
- Create POST Procore API to create a new user in Procore using Power Automate
What is Procore?
Procore is the #1 software dedicated to the construction industry. Procore enhances collaboration, safety, and communication in all aspects of the project life line from precon to closeout in one system.
Use case
Add users to Procore automatically as users are added to Azure AD, based on Microsoft E1, E3, E5, E5 with PSTN, E5 with PSTN and International Calling, and F3 licensing assignment.
Step-by-Step Guide
For our specific use case, we wanted to pull all Microsoft and Office Licensing group configured for group based licensing for all E1, E3, E5, and F3 licenses. Then retrieve all the group members to compare to users in Procore when adding new users via Power Automate.
STEP 1.
Develop the query in MS Graph to GET all Microsoft/Office license groups.
MS Graph can be accessed here: https://developer.microsoft.com/en-us/graph/graph-explorer
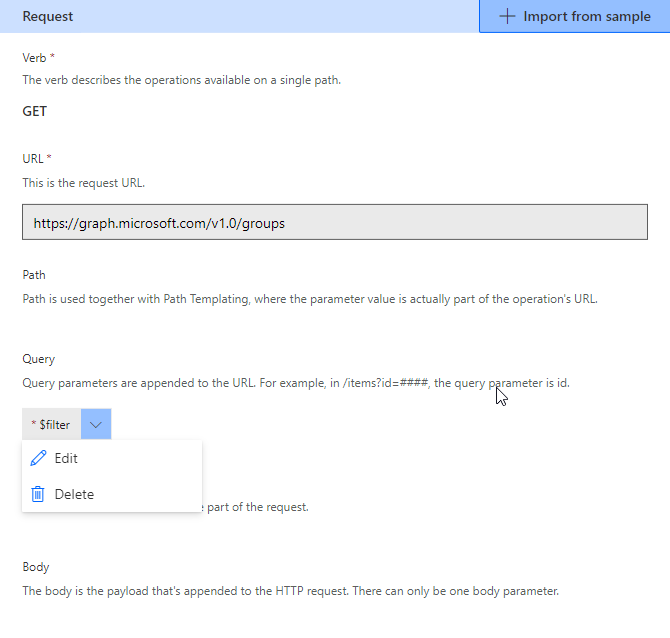
The query was as follows: https://graph.microsoft.com/v1.0/groups?$filter=startswith(displayName, ‘License – Microsoft’) or startswith(displayName, ‘License – Office’)
In our particular case, our group based licensing for Microsoft/Office started with “License – Microsoft” and “License – Office”. In your case it might be different. Adjust the query for your specific needs accordingly. Once you have the query you need:
STEP 2.
Create the MS Graph custom connector to GET Microsoft/Office License groups in Power Automate or Power Apps. I used Power Automate to create the custom connector as follows:
- Go to Power Automate design studio: https://make.powerautomate.com
- Data –> Custom connectors –> New custom connectors –> Create from blank
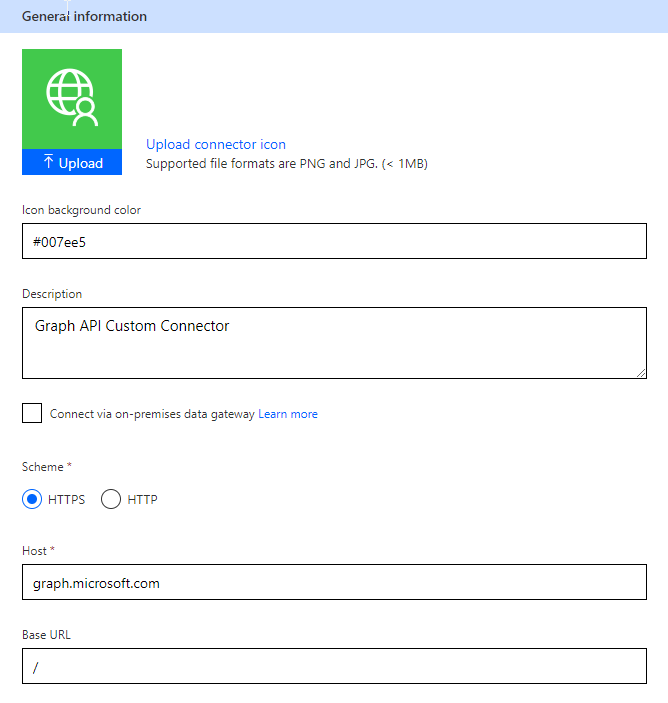
- General –>

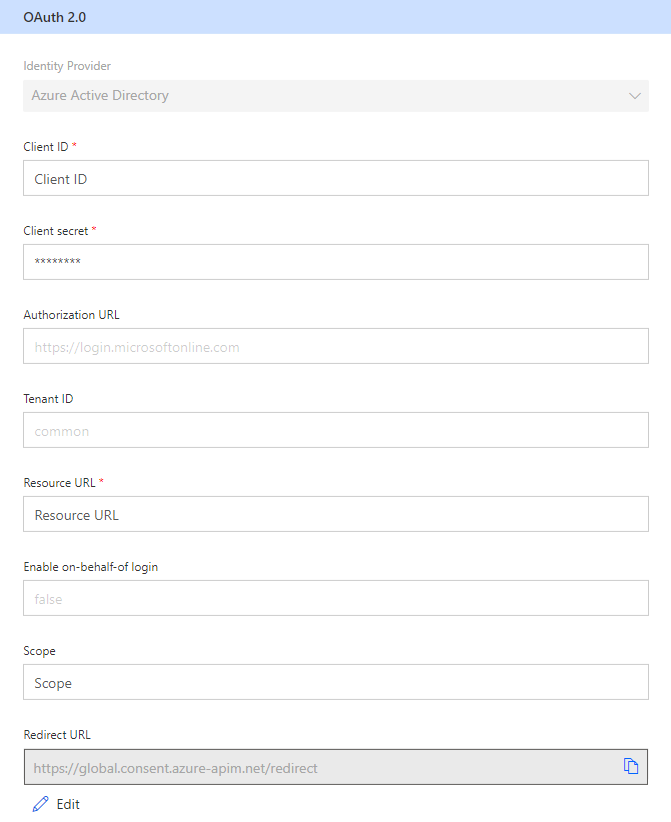
- Security –>

Enter Client ID, Client Secret, Authorization URL, Tenant ID, and Resource URL (https://graph.microsoft.com), all else defaults. When you click “Create connector”, Redirect URL will automatically be generated. NOTE: Information can be obtained from the Azure portal for the app registration you will need to create to access MS Graph API’s. This article will not cover creating the app registration in Azure. Instruction can be found here: Register a Microsoft Graph application – Azure AD B2C | Microsoft Learn - Definition –>
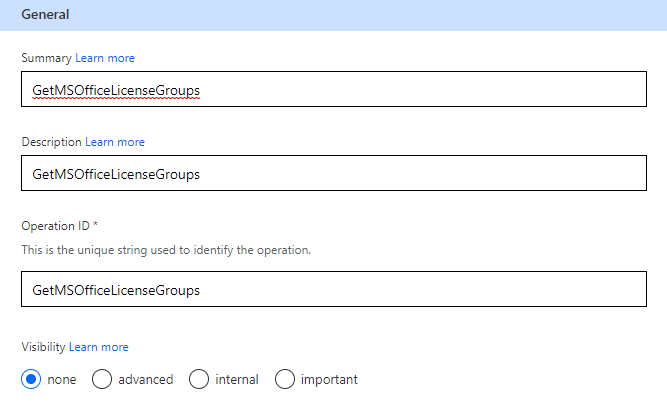
a. General

Enter anything you wish to call your connector in Summary, Description, and Operation ID fields.b. Request
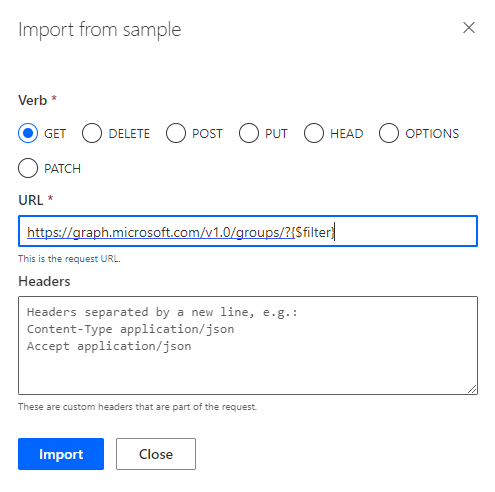
Click on +Import from sample –> Select GET –> In the URL enter https://graph.microsoft.com/v1.0/groups/?{$filter} –> Import
This will add $filter to the Query section of the request.
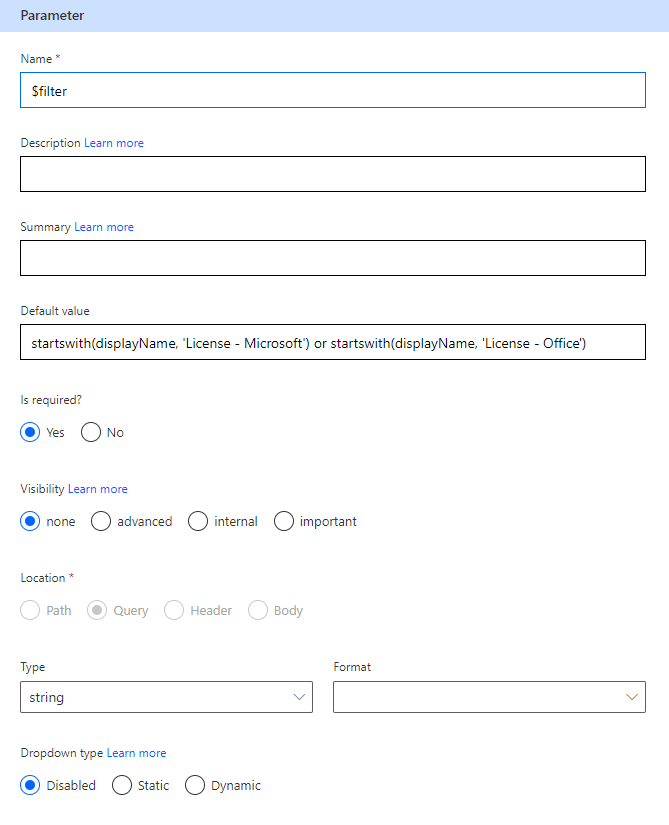
c. Parameter
Click the dropdown arrow –> Edit. Make sure you see $filter in the Name, and the end of the query after $filter= in MS Graph. Which in our case was as shown. All else as defaults. Click <- Back.
d. Response
Click + Add default response –> Copy the output (Response preview) in MS Graph, and paste it the Body section of the Response. No Header information needed. –> Import
e. Validation
You should see a green check mark if all went well. If not, make sure the Response body is correct. NOTE: In some cases, you will need to add the square brackets [ ] around the body request if the output is expecting an array. If it outputs an object, then remove the square brackets and surround the body with the curly brackets { } instead.
Click Update connector. Now you are ready to Test.f. Test
Click New connection –> Sign-in using your Microsoft credentials. NOTE: Microsoft Account will need to have access the the Microsoft Graph API app registration in Azure. Click Test operation. Once you have successfully tested the operation, you will see a Status (200) along with the Body response. Make sure you see Schema validation succeeded at the bottom.


STEP 3.
Develop the query in MS Graph to GET all Microsoft/Office license groups members.
- MS Graph can be accessed from here: https://developer.microsoft.com/en-us/graph/graph-explorer
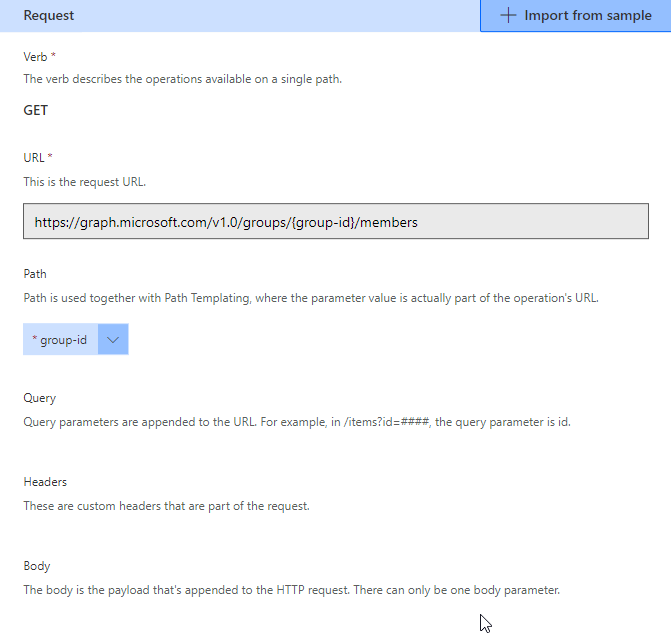
The MS Graph query was as follow: https://graph.microsoft.com/v1.0/groups/{group-id}/members
STEP 4.
Create the MS Graph custom connector to GET all group members based on group-id.
- Same process as above for General and Security.
- Definition
Same process as before except in the Request + Import from sample URL, enter https://graph.microsoft.com/v1.0/groups/{group-id}/members. A group-id parameter will be entered in the Path section of the request.
Nothing left to do in the parameter section. Leave as default. - Response
Retrieve response body from the output in MS Graph. Take note of the square [ ] or curly { } brackets and enter them as needed. Make sure validation succeeded. Update connector –> Test. If all went well, we are ready to build the Procore API custom connector.
STEP 5.
Create Procore Developers account and sandbox/production application. NOTE: You must have a Procore developer account and a Sandbox application created and added to your production Procore environment to create the custom connector.
The Procore developer account can be created here: https://developers.procore.com.
Once you have created the developer account and a Sandbox application has been created, you will need to add the developer application to your production site in order to query your Procore production environment via the REST API’s. To add the Procore developer application to your environment:
- Login to Procore at https://procore.com
- Select Apps dropdown (upper right hand corner)
- Select App Management
- Select Install App dropdown –> Install Custom App
- Enter the App Version Key/ID
The ID can be obtained from your Procore developer portal under Manage Manifests.
- Enter the App Version Key/ID

Additionally, in the Procore developer portal, make note of the Sandbox OAuth Credentials and Production OAuth Credentials. We will need those to create our Procore API custom connector in the next steps.
NOTE: The Procore API documentation can be accessed here: https://developers.procore.com/reference/rest/v1/docs/rest-api-overview.
STEP 6.
Create Procore API custom connector to GET all company users.
- General
In the Host section, depending on if you want to query the Procore API using your Sandbox environment or your production environment, you will use the following URL’s:Sandbox: sandbox.procore.com (the Base URL) will be the part from the Sandbox URL in your Procore developers portal. (see above)
Production: api.procore.com
- General
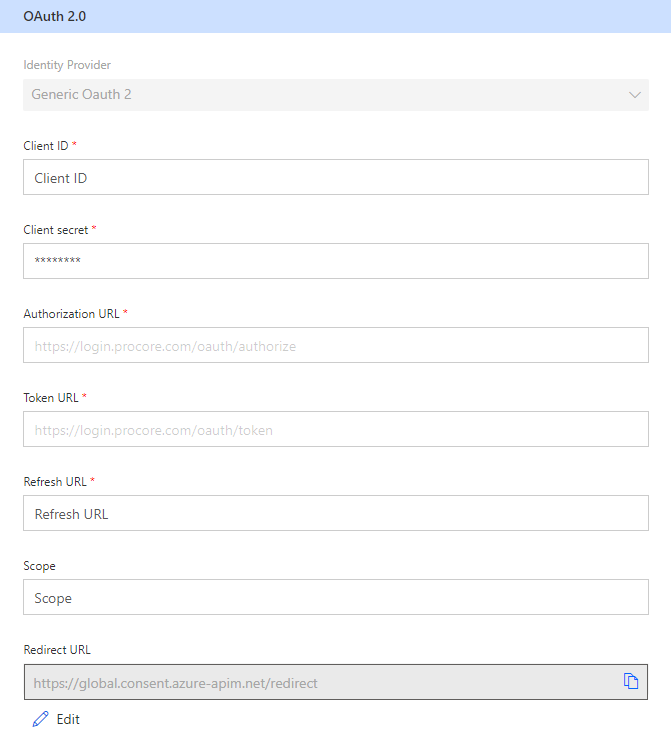
- Security


- Client ID and Client Secret: From the Procore developer portal
- Authorization URL: https://login.procore.com/oauth/authorize
- Token URL: https://login.procore.com/oauth/token
- Refresh URL: https://login.procore.com/oauth/token
- Leave everything else as defaults. Redirect URL will be created automatically after creating the connector.
- Security
- Definition
In the Actions section –> New action
General
Give any name you choose for Summary, Description, and Operation ID.Request
Click on + Import from sample and enter the information as follows:
Note: company-id will be created in the Path section of the request.Response
You can use Postman to explore the Procore API’s. Instructions on creating the Postman workspace for Procore can be found here: https://procore.github.io/documentation/postman
Once you have created the workspace, you can test the Procore API’s then use the response body for this section of the configuration. Or, you can access the Procore API documentation which is filled with all the required information needed. Procore API documentation and the example response bodies can be accessed here: https://developers.procore.com/reference/rest/v1/company-users?version=1.0Validation
If validation succeeded. Create the connector (if you haven’t already done so) or Update connector then Test.Test
Click New connection –> Sign-in to either your Procore production or Procore developer account depending on which URL you are using.
Enter company-id. The company-id can be found in the URL after logging in to your Procore production site. If all goes well, we are ready to create the POST Users to Procore API custom connector.
- Definition

STEP 7.
Create Procore API custom connector to POST company user(s).
- General and Security
Same as above
- General and Security
- Definition
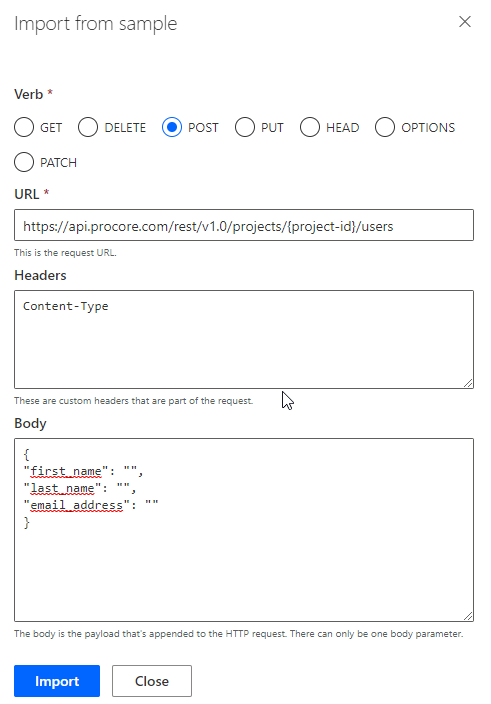
In the Actions section, click –> New action
Enter anything you wish for Summary, Description, and Operation ID.Request
Click on + Import from sample and enter the following information:
Verb: POST
URL: https://api.procore.com/rest/v1.0/projects/{project-id}/users
Headers: Content-Type
Body:
{
“first_name”: “”,
“last_name”: “”,
“email_address”: “”
}NOTE: Procore only cares about the Body information when creating an account. You will see in the next steps how this information plays a role in creating the new user(s) via Power Automate.
Click –> Import
Response
Again this can be obtained from testing the API calls within Postman. Use the body response from Postman for this information. Or you can access the Procore API documentation for the example response bodies as needed. (see STEP 6.)Validation
Once succeeded, click on Create or Update connector, then TestTest
- New connection –> Sign-in to Procore
- Enter Project-id (obtained by signing in to Procore and opening a particular project. You will see the project-id in the URL). In our case, we add users to the Sandbox Test Project and use the project-id accordingly.
- Content-Type: application/json
- Enter a test first_name, last_name, and email_address –> Test operation
If you see Status (200), A new Procore user has been added. We are now ready to move on to the fun part!
- Enter a test first_name, last_name, and email_address –> Test operation
- Definition
STEP 8.
Create the Power Automate flow using all of the custom connectors created from the previous steps to POST user(s) to Procore as soon as they are added to any of the group based licensing groups in Active Directory.
Here is a sample of what the flow looks like.


